Le moniteur série
Le moniteur série est un outil de débogage. Il permet d'afficher les valeurs que l'on veut dans une fenêtre du programme
Un exemple d'utilisation:
Paramétrage dans un programme arduino :
Dans le setup il faut mettre:
Serial.begin(9600); // mise en route de la liaison série à 9600 bauds//
9600 correspond à la vitesse de communication. 9600 bauds est une vitesse rapide fiable
Dans le void loop :
Pour afficher le texte "le contenu de ma variable est : "
Serial.print("le contenu de ma variable est : ");
Pour afficher le contenu d'une variable (par exemple ici elle s'appelle var1)
Serial.print(var1);
Pour aller à la ligne (sinon chaque "Serial.print" affiche les données les unes à côté des autres) :
Serial.println(var1);
Pour ouvrir le moniteur série (il faut une carte arduino raccordée bien sûr!) :
| soit on clique sur l’icône |
soit sur le menu Outils :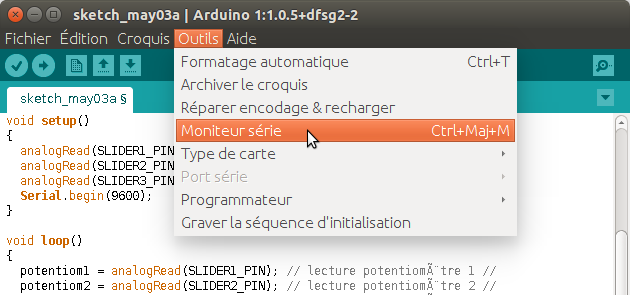
|
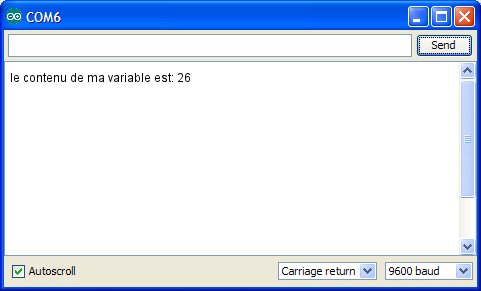
Si le contenu de la variable var1 est 26, on obtiendra dans le moniteur série : |
 |
La librairie "Serial"
Quelques exemples de fonctions de la librairie "Serial" :
Serial
Used for communication between the Arduino board and a computer or other devices. All Arduino boards have at least one serial port (also known as a UART or USART): Serial. It communicates on digital pins 0 (RX) and 1 (TX) as well as with the computer via USB. Thus, if you use these functions, you cannot also use pins 0 and 1 for digital input or output.
You can use the Arduino environment's built-in serial monitor to communicate with an Arduino board. Click the serial monitor button in the toolbar and select the same baud rate used in the call to begin().
The Arduino Mega has three additional serial ports: Serial1 on pins 19 (RX) and 18 (TX), Serial2 on pins 17 (RX) and 16 (TX), Serial3 on pins 15 (RX) and 14 (TX). To use these pins to communicate with your personal computer, you will need an additional USB-to-serial adaptor, as they are not connected to the Mega's USB-to-serial adaptor. To use them to communicate with an external TTL serial device, connect the TX pin to your device's RX pin, the RX to your device's TX pin, and the ground of your Mega to your device's ground. (Don't connect these pins directly to an RS232 serial port; they operate at +/- 12V and can damage your Arduino board.)
The Arduino Due has three additional 3.3V TTL serial ports: Serial1 on pins 19 (RX) and 18 (TX); Serial2 on pins 17 (RX) and 16 (TX), Serial3 on pins 15 (RX) and 14 (TX). Pins 0 and 1 are also connected to the corresponding pins of the ATmega16U2 USB-to-TTL Serial chip, which is connected to the USB debug port. Additionally, there is a native USB-serial port on the SAM3X chip, SerialUSB'.
The Arduino Leonardo board uses Serial1 to communicate via TTL (5V) serial on pins 0 (RX) and 1 (TX). Serial is reserved for USB CDC communication.
begin()
Description
Sets the data rate in bits per second (baud) for serial data transmission. For communicating with the computer, use one of these rates: 300, 600, 1200, 2400, 4800, 9600, 14400, 19200, 28800, 38400, 57600, or 115200. You can, however, specify other rates - for example, to communicate over pins 0 and 1 with a component that requires a particular baud rate.
An optional second argument configures the data, parity, and stop bits. The default is 8 data bits, no parity, one stop bit.
Syntax
Serial.begin(speed)
Serial.begin(speed, config)
Arduino Mega only:
Serial1.begin(speed)
Serial2.begin(speed)
Serial3.begin(speed)
Serial1.begin(speed, config)
Serial2.begin(speed, config)
Serial3.begin(speed, config)
Parameters
speed: in bits per second (baud) - long
config: sets data, parity, and stop bits. Valid values are :
SERIAL_5N1
SERIAL_6N1
SERIAL_7N1
SERIAL_8N1 (the default)
SERIAL_5N2
…………………….
print()
Description
Prints data to the serial port as human-readable ASCII text. This command can take many forms. Numbers are printed using an ASCII character for each digit. Floats are similarly printed as ASCII digits, defaulting to two decimal places. Bytes are sent as a single character. Characters and strings are sent as is. For example:
Serial.print(78) gives "78"
Serial.print(1.23456) gives "1.23"
Serial.print('N') gives "N"
Serial.print("Hello world.") gives "Hello world."
An optional second parameter specifies the base (format) to use; permitted values are BIN (binary, or base 2), OCT (octal, or base 8), DEC (decimal, or base 10), HEX (hexadecimal, or base 16). For floating point numbers, this parameter specifies the number of decimal places to use. For example:
Serial.print(78, BIN) gives "1001110"
Serial.print(78, OCT) gives "116"
Serial.print(78, DEC) gives "78"
Serial.print(78, HEX) gives "4E"
Serial.println(1.23456, 0) gives "1"
Serial.println(1.23456, 2) gives "1.23"
Serial.println(1.23456, 4) gives "1.2346"
You can pass flash-memory based strings to Serial.print() by wrapping them with F(). For example :
Serial.print(F(“Hello World”))
To send a single byte, use Serial.write().
Syntax
Serial.print(val)
Serial.print(val, format)
Parameters
val: the value to print - any data type
format: specifies the number base (for integral data types) or number of decimal places (for floating point types)
Returns
size_t (long): print() returns the number of bytes written, though reading that number is optional
println()
Description
Prints data to the serial port as human-readable ASCII text followed by a carriage return character (ASCII 13, or '\r') and a newline character (ASCII 10, or '\n'). This command takes the same forms as Serial.print().
Syntax
Serial.println(val)
Serial.println(val, format)
Parameters
val: the value to print - any data type
format: specifies the number base (for integral data types) or number of decimal places (for floating point types)
Returns
size_t (long): println() returns the number of bytes written, though reading that number is optional
write()
Description
Writes binary data to the serial port. This data is sent as a byte or series of bytes; to send the characters representing the digits of a number use the print() function instead.
Syntax
Serial.write(val)
Serial.write(str)
Serial.write(buf, len)
Arduino Mega also supports: Serial1, Serial2, Serial3 (in place of Serial)
Parameters
val: a value to send as a single byte
str: a string to send as a series of bytes
buf: an array to send as a series of bytes
len: the length of the buffer
Returns
byte
write() will return the number of bytes written, though reading that number is optional
Example
void setup(){
Serial.begin(9600);
}
void loop(){
Serial.write(45); // send a byte with the value 45
int bytesSent = Serial.write(“hello”); //send the string “hello” and return the length of the string.
}